Tag Archives: plant based

Vegan Good Things: By Popular Demand: Coconut Bacon!

Standard


I don’t know about you, but none of the commercial “faux bacon” does a damn thing for me , but his stuff on the other hand is amazing and satisfying as a bacon substitute.  I also enjoy making my own faux bacon bits using TVP and liquid smoke etc. I find actual bacon to be pretty revolting these days, but sometimes a dish or a craving really does benefit from the salty, smokey flavour profile which these faux bacons provide. Nothing beats cruelty-free and healthier options for old favourites, like my Grandma’s Ukrainian Chinese Food recipe (weird family favourite which formerly involved fried white rice made with egg, bacon and diced dill pickles, which I’ve now veganised using brown rice, organic smoked tofu, coconut bacon and dill pickles. I’ll post the basic recipe soon for those of you who are brave enough or curious enough to try it)

Vegan Good Things: By Popular Demand: Coconut Bacon!. (original article)

A couple notes about this recipe first – the original recipe says to bake it at 400, until it gets crisp. It doesn’t say how long it will take to get crisp. A few other people who made it advised baking it at 400 for up to 30 minutes. I will tell you that the first batch I made, I put it in the oven at 400 and in 10 minutes it was burnt to a crisp. I don’t think that baking pan will ever recover. So I’m printing the recipe below with the time and temperature that I used for my second batch, which came out successfully. If anything, the next time I make it, I might bake it at an even lower temperature, for a longer period of time. My suggestion for you is to just check it every 5-10 minutes or so to make sure it’s not burning, and take it out of the oven when it is just crisp. It will continue to crisp as it cools.

Many of my twitter followers have been requesting this recipe, and I am very excited to share it with you, so without further ado:

Coconut Bacon
makes about 3 cups (enough for 4 – 6 sandwiches, depending on how big you make ’em)

3 large handfuls of large flake, unsweetened coconut
1 Tbsp. liquid smoke
2 Tbsp. tamari
1 Tbsp. water
1 Tbsp. maple syrup (optional, but recommended)

Preheat oven to 300. Place coconut in a shallow baking pan. Combine other ingredients together in a small bowl and drizzle over coconut. Use your hands to mix and make sure the coconut is evenly coated. Bake at 300 for 20 minutes, or until crisp. It will continue to crisp as it cools, and is best eaten at room temperature.
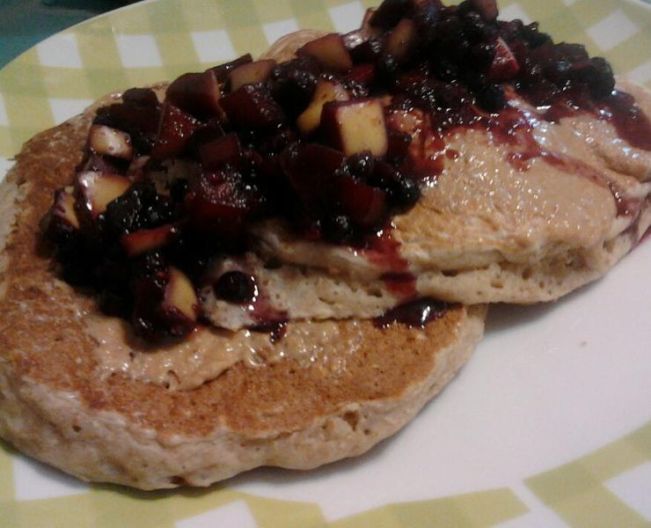
Vegan Oatmeal Pancakes With Sautéed Fruit

Standard
Oatmeal pancakes with peanut butter and stewed fruit.

Oatmeal pancakes with peanut butter and sautéed fruit.


Pancakes are the perfect “brunch” Item for someone like myself who has a bicycle commute between home and work. I bulked these up a bit by adding half a cup of oatmeal, some extra brown rice milk, a splash of apple cider vinegar to my usual Vegan Banana Pancake Recipe and then smearing a tablespoon or so of peanut butter on under the sautéed fruit prior to serving.

How to Make My Fruit Topping:

This is such a great way to use up fruit which is needing to be used up quickly. Today I had four apples which were just verging on being over-ripe, so I decided to mix them into a pancake topping.

What you need:

  • 1-2 cups of fresh fruit  and 1/2- 1 cup of frozen berries
  • 1/8 cup water
  • Agave nectar to your taste (you can use whatever sweetener you usually use, or even add a spoonful of jam or skip the extra sweetener)
  • Cinnamon to taste
  • A splash of lemon juice
  1. Chop your fruit up and throw it in a small saucepan with the water and other ingredients.
  2. Cook over medium high heat until the fruit is cooked to your liking
  3. Enjoy over top of pancakes, waffles, vegan ice-cream, stir it into your coconut yogurt, toss it into muffin batter, dump it in your oatmeal etc (the possibilities are endless)

This is a painfully simple way to save a few dollars by using what you have for a purpose other that what you bought it for. I so often buy more fruit than I can eat and I really dislike throwing food into the compost bin if I can avoid it.


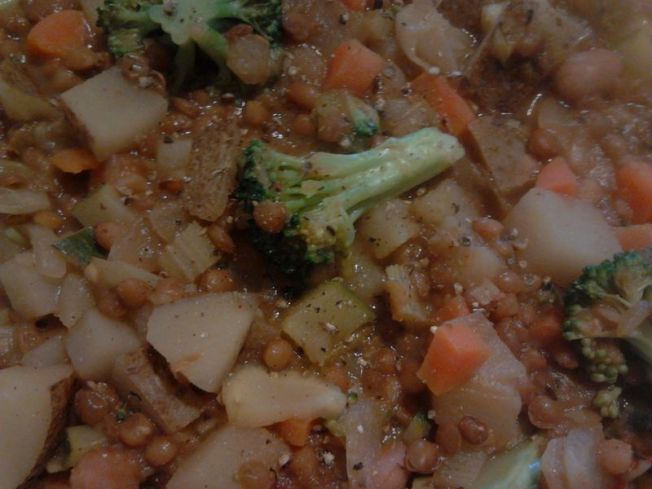
Vegan Lentil Stew, Urban Cycling and Cultivating Peace.

Standard

lentilstew


I thank you God for this most amazing day, for the leaping greenly spirits of trees, and for the blue dream of sky and for everything which is natural, which is infinite, which is yes.
e. e. cummings

Today was pretty darn awesome for me. It was my third shift at my new job and it’s really feeling good for me being there. The staff and the customers are just plain easy to be around, and my shifts just fly by painlessly.

The hour or so I spend on my bike on the way to and from work is seriously just glorious freedom for me. I really don’t understand why so many people become slaves to their cars; they’re just missing out on so much exhilaration, freedom and gym-free exercise. I’m probably quite the ridiculous sight when I bike home (and truthfully the though of how ridiculous I am makes me happy) because I bring music with me and sing my heart out while I peddle home. Today I was jamming to Van Morrison, drumming on my handle bars and basically just sucking up the sunlight and my freedom. I’m studying to get my learner’s license, and then my driver’s but truthfully, I think I’ll always bike in the warm months, it just brings me so much peace. I’ve moved into biking in a harder gear now that I’ve gotten a bit more used to the commute, and my legs and thighs are REALLY feeling the workout.

Tonight for supper I just made a really simple curried stew using tinned lentils, onions, celery. carrots, potatoes,  zucchini,  a chunk of broccoli, herbs, tamari, curry paste and a handful of leftover romano beans. I ate it with some toast and it was really satisfying and I feel good. I love how easy it is to turn PLANTS into a good, fulfilling, healthy meal in no time at all. Most likely I’ll just warm up the leftovers tomorrow and have them with a scoop of brown rice and a small cabbage salad.

I’m reading Being In Balance by Dr. Wayne Dyer currently and I’m really learning a lot about living in a peaceful vibratory state, and about changing my thinking/feeling. This book is really helping me own and release  the anxiety and stress that I usually carry around in me. It’s refreshing to read about stress/anxiety management in this new way. Thinking on a vibrational level rather than an intellectual level seems to really bring some new insight for me. My intellectual understanding of “choosing my feelings” just plain wasn’t doing much for me, but broken down this way it just seems to be more easily applicable. I’m ready to let go of my anxiety and stress and embrace being the peace I know resides at my core. This book really resonates with my current meditation work, and my current focus on balancing my life out wholistically.

I’ve officially decided that I’m much happier, more balanced and more grounded now that my ex isn’t in my life. I’m not blaming him for the fact that I wasn’t happy, or that my life was lacking while I was with him, but I am celebrating my newfound freedom. It’s hard making a life with someone else and truthfully, I’m just really not into the idea of being tied down to keeping house and caring for someone else’s needs at this point in my life. I haven’t yet mastered self-care and balance, and having someone else who needed me to meet their needs really threw me off balance. I’ll always love things about our time together, and I learned a ton about what I do and do not want in a partner and my life.

This song always reminds me to be grateful for my ability to support myself and to love working, even if my job isn’t always what I want to be doing. Something as simple as preparing a nourishing meal and providing a bright moment in someone’s day is a service to humanity, if done with a humble spirit and good intentions. Hating my job isn’t something I need to do today. I’m working in the direction of creating the life I dream of for myself, and where I’m at right now, is just fine. Music is sure a beautiful way to celebrate life.

Crispy Baked Tofu

Standard

crispytofu

I love tofu and I try to eat it between one and three times per week. There is a fair amount of anti-soy hype, which much like the anti-gluten hype, I mainly just ignore. I believe in listening to how our individual bodies respond to what we feed them and following that “internal advice” first and foremost in all things. Of course, I do read assorted health and nutritional studies, and I am very careful to buy non-gmo and organic as much as possible.

I’ve been eating tofu since I was 16 and have found a ton of really satisfying ways to prepare it. This crispy baked version is one of my favourites. I used to use an egg bath prior to applying the coating, but eggs aren’t something I consume anymore, and I now use a chickpea batter in their place.

Y3hQzeJVBKqal7wiARGUzAV4nIlyL4ycOdsNacwqk-Q

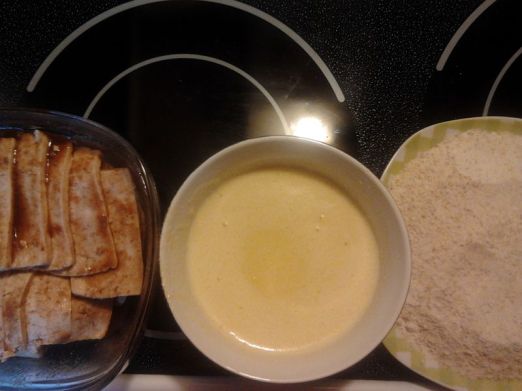
Marinaded tofu, chickpea bath, breading mixture.

Marinade:

  • Vegan BBQ Sauce, teryaki or other sauce you enjoy
  • Onion Powder
  • Garlic Powder
  • Agave Nectar
  • Low Sodium Soy Sauce
  • Liquid smoke (optional, but delicious)
  • Water
  • Any other flavours which appeal to you (be creative, it’s your mouth that’s going to be eating this)

How to Marinade:

  1. Cut some pressed tofu (pressed under a heavy object for 20 minutes to remove extra water) into slices, cubes, triangles or whatever shape most appeals to you, then place in a container with a lid.
  2. Mix the marinade ingredients together until they reach a flavour profile and texture which appeals to you.
  3. Pour the marinade over your pressed tofu and leave marinade for a minimum of twenty  minutes (I usually marinade overnight)

Coating:

  • Chickpea flour
  • Breadcrumbs
  • Wholewheat flour
  • Cornmeal (optional)
  • Brown rice flour (optional)
  • Sea salt
  • Seasonings/herbs
  • Water

How to Make the Chickpea Bath:

  1. Add chickpea flour to one cup of water  and whisk until it is the consistency of runny pancake batter or whisked egg. This usually takes about 1/8 of a cup of the chickpea flour, but it’s really an intuitive process and you should be able to tell by feel how you’re doing.
  2. Add any seasonings you with to the bath (I used a touch of sea salt and a touch of Chinese Five Spice in mine).
  3. Set aside.

How to Make the Breading Mixture:

  1. Add equal parts of wholewheat flour, and bread crumbs to a bowl, mix in  your cornmeal and brown rice flour if you’re using them.
  2. Add any seasonings you wish. I just added some fresh ground pepper and a touch of sea salt.
  3. Pour well mixed ingredients onto a plate and set aside.

How to Put it all Together:

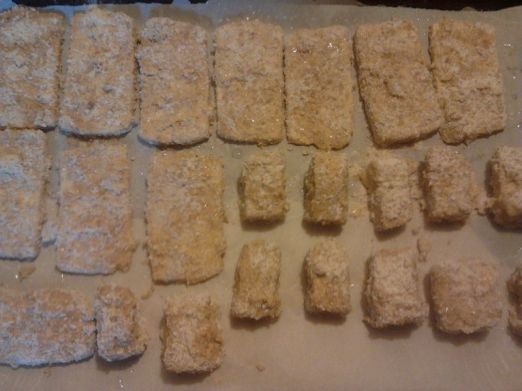
Pre-baking breaded tofu. I make the cubes for supper, and the slabs for making sandwiches during the upcoming week.

Pre-baking breaded tofu. I make the cubes for supper, and the slabs for making sandwiches during the upcoming week.

Preheat oven to 350 degrees and line a cookie sheet with parchment.

  1. Drain tofu of marinade.
  2. Dip each tofu piece into the chickpea bath, shake off excess bath.
  3. Dip and roll each piece in your breading mixture.
  4. Place pieces one by one onto cookie sheet.
  5. Spray each piece with a fine mist of cooking spray or oil (I have a refillable oil misting bottle).
  6. Cook in oven 15 minutes, turn over, spray again then repeat cooking for an additional 15 minutes.

As you can see, my cooking process is usually quite intuitive, which makes recipes hard to share, but once you figure out the basic techniques, there is so much fun to be had with creating new meals.

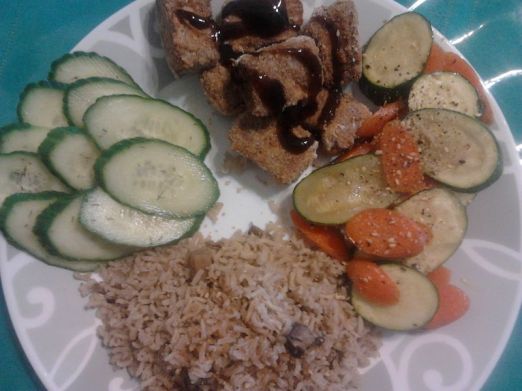
I served this with brown rice steamed with both dried and fresh diced mushrooms, a vinegar marinaded cucumber salad (marinade is 1/8 c rice vinegar, a splash of agave, a touch of sea-salt, 1 cup water and a bunch of dill), and a pile of stir-fried carrots and zucchini. A very simple but very satisfying meal on a summer day. Tofu prepared this way is reminiscent of baked chicken, without the cruelty and cholesterol.

Tofu is rapidly becoming one of the things I cook which my mom looks forward to trying. A year ago she would run the other way if I told her I was serving tofu.

My Current (holistic) Fitness Goals

Standard

An infinity of forests lies dormant within the dreams of one Acorn

– Dr.Wayne W. Dyer

Yoga Class at a Gym Category:Gyms_and_Health_Clubs

Yoga Class at a Gym Category:Gyms_and_Health_Clubs (Photo credit: Wikipedia)


So, as those of you who have been following this blog already know, I’m a type two diabetic and one of my major goals is to reverse my diabetes through a plant-based diet and being active. I’ve lost 35lbs or so over the past two years and have hit a plateau of sorts this year. Part of this has been due to the fact that I’ve been a bit lax this year and fell back into eating a lot more convenience foods for a while there, but mostly it’s been that I stopped putting a concerted effort into getting at least an hour of exercise per day (other than working) in. I’ve decided that it’s time to kick my effort back up as I really would like to be a good 40 lbs lighter by next summer (I’m into slow, steady, maintainable results rather than obsessive dieting).


So, my new job is a 5.2km bike ride away and another 5.2km bike ride home again which is a pretty good chunk of daily cardio but, to kick things up a notch I’m going to commit to doing a few additional things:

  1. I’ll taking a yoga class twice a week, starting next month (I won’t have the spare cash until then).
  2. I will be doing daily an at home TRX workout for 30 minutes. (mostly planks, and squats for now).
  3. I will walk my dog for an hour every morning, come rain, shine, or snow.
  4. I am (and will continue to) work through the book “Quantum Wellness” by Kathy Freston (this is really helping me to balance and focus my lifestyle).
  5. I will meditate for 30 minutes each evening (as I have been recently).
  6. I will post updates about these goals once per week and let you know my progress.


I’m posting a link to a beginner’s TRX workout Youtube video so that those of you who aren’t familiar with TRX can check it out. It’s a great alternative to going to the gym as it’s affordable and portable. I paid 175$ for my system and although I haven’t used it as much as I intended to, I’m really glad that I invested in it, as it will be getting put to good use starting today.


Hopefully, this new routine will bring some really positive results with it. I’m not super obsessed with being thin, but I do really wish to be stronger, healthier and more flexible. My intention is to be healthier at 45 than I was at 25 and although I’ve had a few set backs, I didn’t backslide much at all progress wise and I certainly have a solid start on actually meeting that goal


EZ Tofu Press (Wow, DO I EVER Want one)

Standard
Japanese silky tofu (Kinugoshi Tofu)
Japanese silky tofu (Kinugoshi Tofu) (Photo credit: Wikipedia)

Pressing really does make such a great difference in tofu’s texture and ability to absorb flavours (Dear spell check, that’s how we spell it here in Canada, relax, have a cookie). Pressing and freezing both really help to make it have a more “meaty” texture, which is really nice for some dishes.

This is such a great and simple little gadget, and at such a reasonable price. I tend to press my tofu with a crazy and precarious group of plates, a big rock and a drain board – this would make things so much more simple.

Many people are anti-soy, I’m not one of them. I find that my body processes it very well, and I tend to feel really balanced when I include it in my meals a couple of times a week. I am very careful to only buy the organic, non-gmo varieties however.

The ad is pretty cheesy, and I’m pretty sure I can make one of these on my own, but I sure do love the idea.

EZ Tofu Press. <-click to view website

My Favourite VEGAN Pancake Recipe and, My Best Friend.

Standard
Why yes, I AM THE Banana King!

Why yes, I AM THE Banana King!

So, one of the very first things I learned how to make vegan was these simple, yummy whole wheat (I’ve made these with lots of different types of flour with decent success) banana pancakes. I was absolutely blown away by how light, fluffy and simple these were to make, and how much better they are than any of the omni whole wheat pancakes I’d tried in the past. These are so tasty, that I usually have to make extra, or my mom will eat my share too.

Fluffy Vegan Banana (optional) Pancakes.

(People will NOT guess that these are vegan).

  • 1 cup flour (I use whole wheat most of the time, but sometimes buckwheat ).
  • 2 tsp baking powder.
  • 1/2 tsp sea salt (normal salt will do, but I don’t use it often).
  •  1/2 tsp cinnamon.
  • 1 tbsp sweetener of choice (original recipe called for 3 tbsp, but that was overkill for me).
  • 1 tsp vanilla.
  • 1 cup non-dairy milk (I make my own brown rice milk, or almond milk usually, but in a pinch I use my mom’s soy).
  • 1/2 large ripe banana or one whole small mashed banana (you can substitute *flax or chia gel here if you hate bananas).
  1. Combine all dry ingredients well in a medium sized bowl.
  2. Pour all wet ingredients (including banana) in your blender and blend for 15-25 seconds.
  3. Pour all wet ingredients into the dry ingredients, and combine just enough to moisten.
  4. Cook in a frying pan, as you would cook any pancakes (I use an unoiled Teflon one)
  5. Serve and enjoy

(Makes 4-6 standard pancakes)

To make a chia “egg” just soak 1 tbsp of chia seed in 3 tbsp of water, to make a flax “egg” just soak 1 tbsp ground flax in 3 tbsp of water.

I often poke berries or apples, or even vegan chocolate chips into each pancake while cooking them (prior to turning over) and also often serve them with steam sautéed fruit in place of syrup, but basically, these are really good served any way you like them, don’t be afraid to get creative and experiment with personalizing this recipe.

The little monster at the top of the page is my 13 year old dachshund, Bjorn who is basically the coolest person I know.

Oil and Vinegar Potato Salad Recipe at Epicurious.com

Standard

English: Golden Flesh Yukon Gold Potato


Oil and Vinegar Potato Salad Recipe at Epicurious.com. <-(to see the original article please click this link)

I’m going to make this potato salad tonight (and pair it with my constant companion, the chickpea cutlet), but instead of red wine vinegar I’m going to use rice wine vinegar (I’m in the mood for sometime lighter tasting). It should be pretty tasty. I’ll likely tweak the heck out of the seasoning as usual, and cut waaaay back on the oil – 1/4 cup of olive oil might taste really good, but it’s way more than is healthy for a type two diabetic like myself.

My current budget allows me to center my meals around rice, beans, tofu, and inexpensive vegetables and fruits (potatoes, apples, carrots, beats, onions, celery, gai lan, bok choy, turnip, cabbage etc etc). For the next little while the recipes I post AND try will mostly be “peasant” style cooking, which is quite honestly my favourite style of cooking most of the time. It’s not as much fun to read about, or share, but it makes me happy to know that I’m eating the way that people in less industrialized countries do. My love of cooking and baking comes from studying hippie-made cookbooks so, rustic is pretty much my default style.

I was sad to be thinking about putting this blog on hold, until I realized that I can’t possibly be the only person out there who is trying to get by on a plant-based diet on a college student sized budget (speaking of which – I start college in September).

Yield:

Makes 4 to 6 servings


For more of a bite, add two
to three teaspoons of whole grain mustard
along with the olive oil.

Ingredients:

  • 1 1/2 pounds Yukon Gold potatoes (about 5 medium), unpeeled <- I only peel potatoes or carrots if I’m doing something “fancy”
  • 1/4 cup red wine vinegar
  • 1/2 teaspoon sugar
  • 1/2 small red onion, very thinly sliced
  • 1/4 cup extra-virgin olive oil
  • 2 tablespoons chopped fresh Italian parsley

Preparation:

Cook potatoes in large pot of boiling salted water until tender, about 30 minutes. Drain. Cool to just warm, 10 to 15 minutes; peel potatoes. Cut each potato in half, then cut into 1/3-inch slices.

Place warm potatoes in large bowl. Stir red wine vinegar and sugar in small bowl until sugar dissolves, then drizzle over potatoes. Toss to coat. Mix in onion slices. Season to taste with salt and pepper. Cool to room temperature.

Add olive oil and parsley to potatoes. Toss well and let marinate at least 20 minutes and up to 2 hours at room temperature.

Vegan Recipe: Falafel Sliders – YouTube

Standard

This recipe sounds amazing. Falafel is TOTALLY one of my favourite foods of all time. I’m constantly looking for a low fat/oil falafel recipe which has the right texture to totally fullfill my craving.

Falafel Sliders with Avocado Hummus
Serves 4

Make-Ahead Tip:
Uncooked Falafel Sliders can be made in advance and kept refrigerated until ready to cook. Tahini Sauce can be made in advance and kept refrigerated.

FALAFEL SLIDERS
1 (15-ounce) can chickpeas, rinsed and drained, divided
½ red onion, finely chopped
2 cloves garlic, quartered
5 sun-dried tomatoes packed in oil, drained
½ cup packed fresh Italian parsley
1 teaspoon ground cumin
1 teaspoon ground coriander
1 teaspoon sea salt
½ cup garbanzo flour (or other flour of choice)
2 tablespoons olive oil

AVOCADO HUMMUS
¼ cup chickpeas, reserved from sliders
1 avocado, pitted and peeled
1/3 cup packed fresh Italian parsley
¼ cup olive oil
1 clove garlic
1 tablespoon lemon juice
½ teaspoon sea salt
¼ teaspoon cayenne

TAHINI SAUCE
½ cup tahini
½ cup water
1 clove garlic
1 tablespoon lemon juice
½ teaspoon salt

14 mini buns or dinner rolls sliced in half, toasted
2 small tomatoes, thinly sliced

To make the Falafel Sliders: Reserve ¼ cup chickpeas for the Avocado Hummus. Place remaining chickpeas, onions, garlic, tomatoes, parsley, cumin, coriander, salt, and flour in a food processor and pulse until combined, stopping frequently to scrape down sides. Using the palms of your hands, form mixture into 2-inch by ½-inch patties.

In a large nonstick skillet, heat oil over medium-high heat and pan-fry patties in batches, letting cook about 3 to 5 minutes on each side, until nicely browned. Do not crowd the pan. Remove from pan and drain on paper towels.

To make the Avocado Hummus: Combine ¼ cup chickpeas, avocado, parsley, oil, garlic, lemon juice, salt, and cayenne in food processor and puree. Adjust seasoning to taste.

To make the Tahini Sauce: Puree tahini, water, garlic, lemon juice, and salt until smooth.

To serve: Layer the Falafel Sliders, Avocado Hummus, Tahini Sauce, and sliced tomato on the buns.”


Source:

Vegan Recipe: Falafel Sliders – YouTube.

MY Version of the Apple Fritter Cup.

Standard
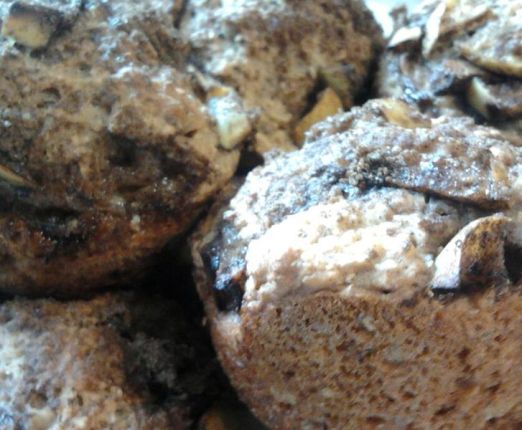
My Fritter muffins

My Fritter muffins

So, as you know I posted pictures of my attempt at making the Happy Herbivore’s apple fritter cups and mentioned that I just didn’t enjoy the texture of them at all. I adored the idea and the flavour profile very much so,  I decided to modify her recipe (I LOVE 95% of her savory recipes, but her baked goods often disappoint me) and make my version into a cross between her apple fritter cups and my whole wheat muffins.

Recipe:

Batter:

  • 2 cups whole wheat pastry flour
  • 1/2 cup brown sugar (or granulated sweetener of choice)
  • 1/2 cup apple sauce
  • 1 teaspoon cinnamon (adjust to taste)
  • 1/2 teaspoon ginger (adjust to taste)
  • 3 teaspoons baking soda
  • 1 tablespoon chia seeds
  • 1/2 cup diced apples
  • 1 teaspoon apple cider vinegar or lemon juice
  • 3/4 cups non-dairy milk of choice

Topping:

  • 1 1/2 cups diced apple
  • 3 tbsp (or to taste) brown sugar (the glaze in the original recipe was not a hit in our house, so I made the topping more sugary instead)
  • 1 teaspoon cinnamon (or to taste)

Preheat Oven 400 deg

Oil or line 12 muffin cups and set aside

1). Combine apple sauce (I just throw an apple, some cinnamon and a splash of water in my blender to make the apple sauce) with the chia seeds in a small bowl, stir well and leave to gel on the counter.

2). Combine milk and apple cider vinegar and whisk together well until frothy, set aside.

3). Mix 1 1/2 cups chopped apple with 1 teaspoon cinnamon and 2 tbsp brown sugar to make topping.

4). Combine remaining dry ingredients in a mid sized bowl.

5). Add remaining 1/2 cup diced apple and wet ingredients (don’t forget your apple chia gel) into the dry ingredients and just mix together until just barely wet.

6). Spoon batter into muffin cups, then top with your cinnamon, apple, brown sugar mixture.

7). Pop muffins into your preheated oven and bake for 20-25 minutes, or until a toothpick poked into a muffin comes out clean.

8). Allow muffins to cool completely and enjoy with friends and family.